Do you know how to make a torch for yourself? Learning how to construct a rudimentary DIY torch seems to be a vital survival technique to have in your inventory whenever the world goes dark & your lights have long ago died. Allow light to shine! Is it possible to make a wood torch that lasts for hours but is not dangerous to use? It is a critical question to consider.
Because more and more people are prepared for a probable collapse these days, every wise survivalist should think about how they’ll stay lit for years if they lose electricity over a long-term period. There seem to be a variety of backup generator alternatives available, but the best solution is something that’s not powered by electricity. It was one of those tried-and-true survival techniques that work in every situation. That’s correct, and we’re discussing how to build a pitch-soaked torch from the ground up.
There seems to be a variety of backup solutions available, such as electrical systems, solar power, etc., that may be useful in the short term. But nothing beats understanding how to make a DIY torch in terms of reliability. It is a backup talent that no one can deprive you of.
The contents will be followed in the article:
- How to make a torch in the forest
- Process of making torches
- How do torches work?
How To Make A Torch In The Forest? – Basic Steps
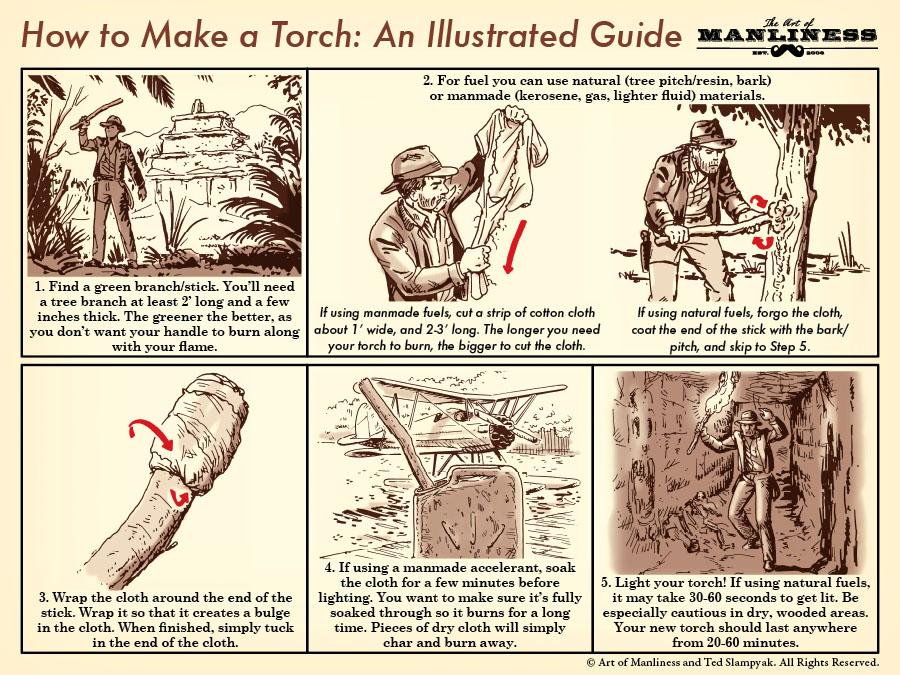
- Locate a green tree or stick. Any tree limb that is at least 2′ long and a couple of inches thick would suffice. You wouldn’t want your grip to ignite together with your fire, therefore the fresher the better.
- One can use either natural (wood pitch/resin, peel) or synthetic (Kerosene, gas, motor oil) sources for fuel. Prepare a piece of cotton fabric about 1′ broad & 2-3′ long if you’re using synthetic fuels. The larger the material to slice, the longer users need their torch to fire. If you’re utilizing natural fuels, remove step five and instead use the bark/pitch in order to cover the end of that deal.
- Wrap the fabric around your stick’s end. Thread it around the fabric to create a protrusion. Simply fold the cloth’s edge in when you’re done.
- If you’re using a synthetic ignition source, soak the towel in water for a minute before igniting it. Please ensure it’s completely saturated so it can fire for a long period. Dry fabric pieces will just sear and cause burns.
- Turn on your wood torch! This could take 30-60 secs to get a fire going when utilizing natural materials. In dry, forested regions, be extra cautious. The lifespan of your new DIY torch should be between 20 and 60 minutes.
Process Of Making Torches
Selecting a fuel to make a medieval torch
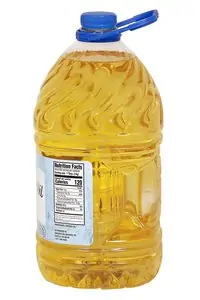
Vegetable oil becomes less expensive than kerosene and seems to be safer to use.
People in third-world nations either do not have the financial means to buy significant volumes of cooking oil. Others are so used to consuming kerosene that they have been unaware that healthier and cleaner alternatives will be.
We in modern nations can acquire cooking oil in huge quantities and securely store it without the worry of our entire house exploding if it were ever put on fire (although vegetable oil cannot be incinerated until it is warmed to 450 ° f first). As a result, having a store of veg oil poses no danger.
After investigating the principle behind early torches and examining what is currently available in the way of torches, it seems that there aren’t very many widespread applications for torches anymore, save from a backyard “Bellini” torch that typically burns citronella gasoline.
Furthermore, the fires in those outdoor Tricorn hats are pretty minor. Whenever it comes to utilizing a torch, many of us should undoubtedly appreciate something that produced light and heat on a similar size to a modest bonfire.
Cooking oil is inexpensive, safe, and produces extensive burns in your homemade torch.
Kerosene oil can burn if you strike it with a spark. It’s hugely explosive, which is why it’s sparked so many wildfires and burnt down many cottages and shelters in the past.
Cooking oil would not be able to accomplish this. If you put a match in olive oil, this will extinguish the flame, but the oil will not burn even though the pet is still blazing if you throw your torch and lantern over, whatever cooking oil that pours on it could be enough to extinguish it. Vegetable oil is a far safer option than kerosene in this case. As a result, we choose to use vegetable oil mostly as fuel.
You can easily find the oil from your local store or supermarket or to save time buying online is ideal, this is linking to amazon.com
How to Make a Torch: Picking a Wicking Material
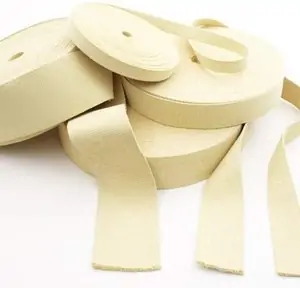
Wicks may be constructed from a variety of materials. When you’re in a hurry and find yourself in a crisis, you could even utilize your garments. The critical thing to remember is that this is Not the blazing flame; in contrast, a flame made of a difficult-to-burn substance is preferable. You’re igniting the gasoline rather than the candle. The wick serves as a container for the fuel. And they’re less combustible; materials like glass or Kevlar are preferable over paper or linen.
Fiberglass is among the components we suggest for a rescue torch flame. The advantage of fiberglass is it could be reused, which is not the case with cotton wicks. Those materials don’t last indefinitely, but you can recycle them if you use similar fuel. Fiberglass is indeed advantageous since it is very inexpensive. For creating your flames, we recommend using 1/2 inch and 1/4 mm thickness wicks. If you go narrower than that, you’ll end up with wicks that are more suited to gas lamps and the like.
Kevlar is another viable choice. Artists are still using natural fire sticks like fire jugglers and acrobats, and it turns out. One might wonder how they keep their pyrotechnics lit, so they don’t burn off and run out of gasoline. They make use of Kevlar.
Kevlar became an excellent wick material, which is widely utilized by today’s flame jugglers and others who practice “fire poi.” A three-foot length of Kevlar may be sliced into multiple trim wicks, one of which can be used on a few occasions and burned for a few hours on average. Kevlar flames, like fiberglass coils, may be reused several times.
Whichever material you pick for your flame, the first step you’ll have to do is immerse it in olive oil for at least a few minutes, but you may leave your fiber or Teflon wicks resting in a tiny bottle of vegetable oil or use it as the need comes a few days later. It’s usually best to keep your filaments soaking in the fuel and cover them, and you’ll be able to construct a flashlight whenever you need it.
Assembling the components of a wood torch
A primary fire torch could be made out of a medium-sized pole (2–4 inches in height) with a cooking oil wick (whether Kevlar or fiberglass) wrapped from around the upper end. Fire fiddlers utilize two bolts to secure their flames to their ornamental metal lamps; if you’ve got a power tool and a few fasteners, you can do the same.
Whenever it comes to defense, though, our flame torches shouldn’t have to be that tidy; only a wick wound securely in wire mesh would suffice. This is most likely the type of Homemade essential torch that comes to mind when you consider creating your own.
When making a medieval torch, utilize stainless steel cable rather than galvanized wire mesh. Galvanized steel has zinc covering to prevent it from rusting; not only are metal fumes hazardous, but there may be small quantities of lead contained in the galvanizing steel’s hiding, which can generate toxic fumes. This is because when a fire warms carbon steel, poisonous gases are released.
How Do Torches Work?
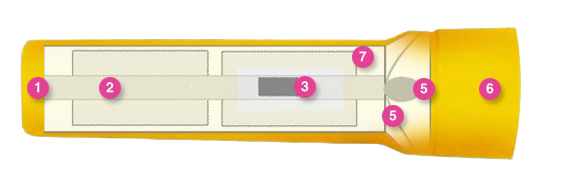
Whenever a flashlight’s transistor is opened on, it creates contact with two contact sheets, which initiates an electric current supplied by the battery. The packs are wired up in a way that energy (electrons) flows between the indicator electrodes. The cells are held in place by a tiny spring linked to a touch strip.
The connection strip runs through the middle of the battery’s casing and connects to one of the device’s sides. But at the other edge of the button, another flat contacting strip attaches to the light (lamp) and provides an electronic signal.
The tungsten bulb or LED throughout the lamp starts to glow once triggered by power, generating visible light. The light is reflected by the mirror that surrounds the bulb. The mirror re-directs the lamp’s visible light, resulting in a continuous light source that you see coming from the torch. The bulb on your torch is protected by a transparent lens, which prevents the lamp’s material from shattering.
When the torch switch is pressed to the OFF state, the two supporting strips are physically separate. The electromagnetic current’s route is disrupted, thus shutting down the flashlight’s light generation and switching it off.
To make the compact torch operate, all of the components mentioned above must be linked and positioned. Otherwise, you’ll have an output voltage, which will prevent power from flowing.
Can I use a gasoline base with my DIY flame or not?
It is unquestionably preferable not to have a fuel basis. Just for one torch, using such a gasoline base may give you many hours of fire use at a period. Many torches can provide a ring of light around your campground and perhaps keep unwanted creatures away.
However, if you’re in a combat scenario and need to carry a pitch soaked torch to walk in the dark or even explore caverns (which has several risks that are too numerous to discuss in this post), you may utilize the same tactics that professional flame jugglers use for your torch. And here is the how to go about it:
Use the filaments that have previously been pre-soaked in olive oil. Alternatively, soak a piece of fiberglass or Kevlar flame in paint thinner, kerosene (lubricant), and even Coleman gasoline for many inches. If you’ve not pre-soaked the wick materials, you’ll need a simple fuel.
After the wick has been wet, wrap this around the top of a long pole or pole and fasten it with a steel sheet (wrapped firmly around the flame); then ignite it. Remember that, while vegetable oil requires longer to heat up, this will burn for a more extended period than most other combustible fuels. It’s less expensive and safer.
Making a fuel foundation for your homemade torch
You could use a tiny container (fuel foundation) to carry the olive oil that the flame will use as fuel, similar to the famous backyard Swastika flags. While the commercially made Tiki torch may be used, our objective is to educate you on techniques to apply in real-life circumstances. In a crisis, the tiki light you have stashed in your cellar might not have been available.
If you’re in a combat scenario, you might have to make your energy base for a torch out of anything you can find. An empty coke can (with the aperture widened with a knife to accommodate you are wrapped up wick) or even a tiny beer, champagne, or glass beaker could also be utilized. Do you recall the welding rod? Use it to tie your energy base (a tiny container that holds your fuel and from which the flame rises) to the floor of the flame stick.
If users hold your light at a slant and the wick doesn’t fit snugly in the gasoline base, the oil may leak out. It’s why your DIY torch needs a thick, popped wick; it’ll block the mouth of the bottle and prevent unsalted butter from leaking out if the torch is placed at an inclination for a few minutes.
However, for even the most parts, use caution and hold your torch horizontally. In any instance, keep holding the end of the spectrum to a flame to ignite it if you’re using a gasoline base or otherwise. Vegetable water is an adequate fuel since it only pets at an elevated temperature, making life harder than kerosene.
If you’re not using fire to ignite your light, locate some paper or another easily combustible material, coat it with olive oil, and light it. Now, with the end of your torch held against the explosive substance, it should start to burn.
Related video clip: https://youtu.be/gAemBu3yMtQ
Conclusion
Knowing how to make a torch with only a few basic items is a vital ability, whether you’re exploring the forest in a combat scenario or seeking riches deep in the vaults of an old castle. Moreover, with this skill of making torches, people will be able to struggle for survival in a harsh situation.
You’re all set to go exploring! Or throw a luau or anything you want. Just be cautious with the flame and be ready to put it out at any time if something goes wrong. If you have any questions about some common problems related to how to make a torch, contact us. Please feel free to share, or leave a comment below as I wish you all happiness and good health.
Your perfectly optimized content goes here!